Sketchup for interior design
Master Sketchup for interior design projects

- Description
- Curriculum
- FAQ
- Reviews
Sketchup
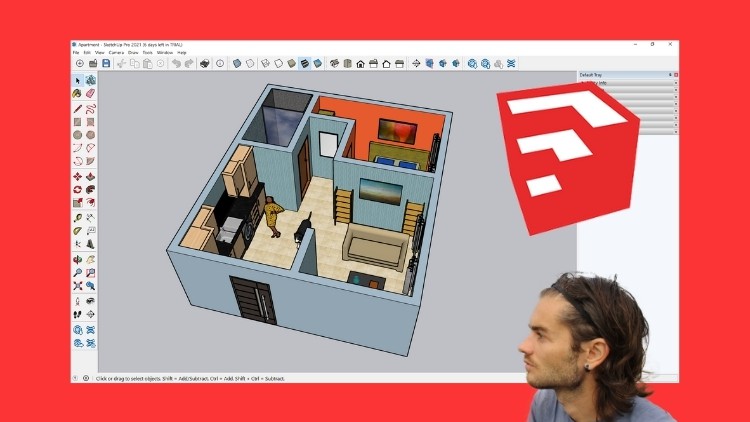
Sketchup is an intuitive 3D modeling software that lets you create and edit 2D and 3D models including the push and pull tool that allows designers to extrude any flat surface into 3D shapes. It is a program used for a wide range of 3D modeling projects such as architecture, interior decoration, landscape architecture or the design of objects for industry, to name a few. one of its uses. The program includes drawing layout functionality, surface rendering and supports third party plugins. There is also access to a gigantic bank of 3D objects that can be imported directly into the design project.
Advantages of Sketchup
– Sketchup is simple, fast and intuitive software compared to other 3D modeling software.
– You can already make simple models after only a few hours of learning.
– SketchUp makes it possible to produce models made up of few faces.
– Due to its non parametric modeling principle, SketchUp is suitable for a large number of uses.
– It has a large collection of free components with the 3D Warehouse.
– There are a large number of plugins, many of which are free like Twilight Render to create realistic renderings.
Training course
In this training course you will start with Sketchup by starting by discovering the working interface. Then we will all the basics of Sketchup with shape design tools, how to create components, how to integrate color or textures, how to use the 3D Warehouse to import images. Then we will specialize in interior design. For this creation of two of an apartment interior. We are going to create a 2D plan to scale with dimensions, and coloring of its 2D plan. Then we will model the plan in 3D rendering with integration of elements from the 3D Warehouse. We will also see how to create furniture yourself using the different tools. Finally, for a final rendering of the project, using the free Twilight Render plugin, we are going to make a more realistic rendering closer to reality. To embellish your design and offer more qualitative work.
Design tool
-
1
 Introduction
Introduction
-
2
Place the toolbox
Place the toolbox to create your dashboard
-
3
Move in your workspace
Learn how to move in the workspace
-
4
The three axes
Understand the three axes
-
5
Start and open document
Start new document and open saved document
-
6
Save and export
Save your document and export your document in image file
-
7
Difference between edges and faces
Understand the difference between edges and faces
-
8
The views
The different views
-
9
The shadows
The shadows
Add text and dimension
-
10
Rectangle tool
Rectangle tool
-
11
Rotated rectangle tool
Rotated rectangle tool
-
12
Circle tool
Circle tool
-
13
Freehand tool
Freehand tool
-
14
Arc tool
Arc tool
-
15
Line tool
Line tool
-
16
Follow me tool
Follow me tool
-
17
Push pull tool
Push pull tool
-
18
Offset tool
Offset tool
-
19
Scale tool
Scale tool
-
20
Dimension tool
Dimension tool
-
21
Eraser tool
Eraser tool
-
22
Move tool
Move tool
Colors and materials
The components
3D Warehouse
Sections and scenes
Furniture modeling from scratch
Create 2D plan of a room
3D modeling of the room
Improve your rendering with Twilight Render
Create 2D plan of an appartment
-
48
Install Twilight Render toolbox
Place your Twilight Render toolbox
-
49
Room Twilight edit material
Edit the materials before render
-
50
Room Twilight edit environment
Edit environment before render
-
51
Room Twilight start rendering
Start rendering with Twilight
-
52
Room Twilight start rendering with wall
Start rendering in Twilight with wall
3D modeling of the appartment
Improve your rendering with Twilight
-
57
Appartment add wall
Add the walls from the plan
-
58
Appartment add doors and windows
Add the doors and the windows
-
59
Appartment create bathroom
Design the bathroom
-
60
Appartment create the room
Design the room
-
61
Appartment create kitchen
Design the kitchen
-
62
Appartment create living room
Create the living room
-
63
Appartment finishing part 1
Design the finishes part 1
-
64
Appartment finishing part 2
Design the finishes part 2
-
65
Appartment save and export
Save and export your final work
How long do I have access to the course materials?
You can view and review the lecture materials indefinitely, like an on-demand channel.
Can I take my courses with me wherever I go?
Definitely! If you have an internet connection, courses on Udemy are available on any device at any time. If you don't have an internet connection, some instructors also let their students download course lectures. That's up to the instructor though, so make sure you get on their good side!
Stars 5
10
Stars 4
10
Stars 3
7
Stars 2
4
Stars 1
4
Course details
Video
9 hours
Certificate of Completion
Popular courses


Social Network