Learn Animation Production with Blender
- Description
- Curriculum
- FAQ
- Reviews
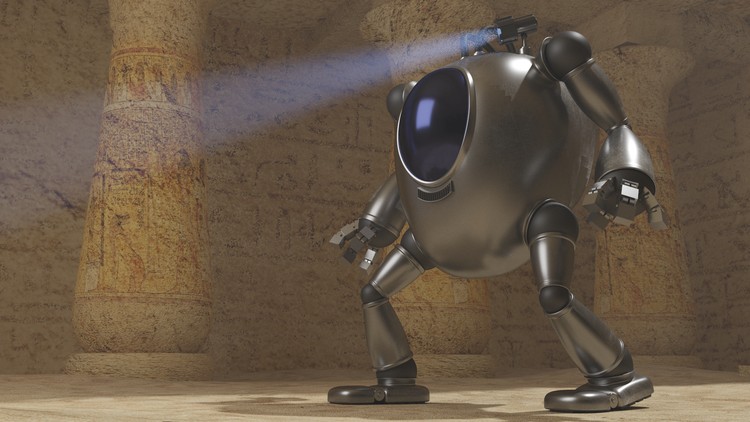
Do you have a story to tell? An idea to bring to life? Then join me for this project-based introduction to Blender and 3D animation. In this course we’ll go through the process of creating an animated scene in Blender from scratch. From the first polygon to the final render. You’ll learn all the steps involved in bringing your own 3D animations to life.
We’ll start with the Blender user interface and navigation tools, providing you with a solid foundation before moving forward. We will then begin modeling the mech character and the environment. You’ll learn how to UV map your 3D objects in Blender and texture them. We’ll use GIMP to prepare the textures, and the node editor to apply them to Cycles materials in Blender.
You’ll learn how to rig and animate the mech in Blender 3D, as well as animate the camera in the scene. We’ll create volumetric lighting and even create a jet flame effect for the mech’s jet pack.
Finally, you’ll learn how to render out your animation and use the Blender video sequence editor to create a Quicktime movie.
Topics covered:
• Blender 3D Interface and Navigation
• 3D Modeling
• UV Mapping
• Materials and Texturing
• Rigging
• 3D Animation
• Lighting
• Physics Effects
• Rendering a 3D scene
Darrin Lile is a Blender Foundation Certified Trainer
“I love your tutorials! For the first time, I’m able to understand Blender! Thank you so much!” -Jade W
“Great work, Darrin. You make a great teacher as well as a fantastic 3D artist. I really appreciate your work; can’t wait to see what you do next! -theLegendofSamuel
“I just wanted to say how much I appreciate these high quality tutorials you put out!!! You are truly an inspirational person. -Zach B
Software used: Blender 3D and GIMP; both are free, open source programs that can be used for any purpose.
-
2Interface and Navigation
If you're new to Blender and 3D animation, it can be a bit daunting to open up the program and see all the window and buttons. But in this lecture, we go over Blender's interface and navigation tools to give you a solid foundation before moving forward.
-
3Manipulating Objects
Blender's transformation tools give you the ability to move, rotate, and scale your 3D objects. This lecture provides an overview of the manipulators and short cut keys used to transform objects.
-
4Edit Mode
Beyond the transformation tools of Object Mode, Blender's Edit Mode gives you access to the fundamental components of your 3D models. This lecture show you how to move between Vertex, Edge, and Face mode, giving you the ability to create more complex objects.
-
5Modifiers
Blender's modifiers allow you to alter your 3D object non-destructively as you model, and you can stack multiple modifiers in various orders to get different effects. In this lecture we will work with the Mirror modifier and the Subdivision Surface modifier.
-
6Booleans
Another useful modifier in Blender is the Boolean modifier. This allows you to cut one 3D object with another. In this lecture, we work with the Intersect and Difference operations of the Boolean modifier.
-
7Modeling the Shoulder
In this lecture we begin modeling the shoulder of the mech. We go over how to extrude a circular shape from a surface of square polygons. In the process we go over Blender's Merge and Circle Select tools.
-
8Modeling the Arm
We begin modeling the mech's arms in this lecture, building the arm up from primitive 3D objects. We use Blender's Snap menu, Global and Local transform orientations, and the Loop Cut tool.
-
9Object Origins and Parenting
Blender allows you to move the origin of an object and it's pivot point independently of each other. In this lecture, we use this feature to establish the rotation points of the finger joints. We set-up the parenting hierarchy of the fingers as well.
-
10Modeling the Upper Leg
In this lecture we use the same process for modeling the legs in Blender as we used for the arms. We also talk about increasing and decreasing our selection of faces with Ctrl and the numbed + or - keys.
-
11Modeling the Foot
Using Blender's Subdivision Surfaces modifier can be very useful when blocking out the rough shape of a 3D object. In this lecture, we use the SubSurf modifier as we create the feet of the mech character.
-
12The Bridge Tool
Blender's Bridge Tool allows us to connect two edges with polygon faces, filling in the empty space. In this lecture we use the Bridge Tool to create the mech's lower leg.
-
13Mirroring and Applying Transforms
In this lecture we use Blender's Mirror modifier to add the arm and leg on the right side of the mech. We also talk about applying rotation and scale so that the mirror function behaves the way we expect.
-
14Adjusting Proportions
Now that we have the basic parts of the mech created, now is a good time to adjust the character's overall proportions. We use Blender's Separate function to break objects apart to group them more logically.
-
15Separating and Naming Objects
-
16Edge Loops and Smoothing
No real-world object has the kind of sharp corners that we get on our 3D models. In this lecture we use Blender's Subdivision Surface modifier to round off the corners of our objects to make them more realistic. We also use the Loop Cut tool to insert edge loops so we can control how sharp or rounded the edges are.
-
17Detailing the Leg and Arm
In this lecture, we use Blender's Loop Cut tool to continue adding edge loops to the legs and arms of the Mech. With the edge loops we create, we get new face loops that can be extruded to provide extra detail on the mech.
-
18Creating Tubes with a Bezier Curve
Using Blender's Bezier tool is a great way to create paths for tubes and pipes. In this lecture we use the Bezier tool to create the tubes at the top of the mech.
-
19Thrusters and Soles
In this lecture we start with basic primitive objects, like the cylinder and cube, to create the mech's jet pack thrusters and the soles of the feet. We use Blender's Subdivision Surface modifier to give these objects more realistic edges.
-
20Proportional Editing and Normals
In this lecture we use Blender's Proportional Editing tool to bend a circle so that it molds to the curved surface of the mech. After extruding the shape to give it thickness, we also use the Flip Normals function to reverse the polygons so they face outward.
-
21The Array Modifier
Blender's Array Modifier allows you to duplicate an object a defined number of times, and at certain distances. In this lecture we use the Array Modifier to create the vent on the front of the mech's body.
-
22Modeling the Instrument Panel
In this lecture we use Blender's primitive objects to create an instrument panel for the mech character. We use the Join Tool to combine all the pieces into one object, and then put it in place on the back of the mech.
-
23Final Details of the Mech
The last part of the mech that needs to be created is the light on the top. We use many of the modeling tools we covered in previous lectures to create the spot light. We then use Blender's Join Tool to combine all the pieces into one object so that we can move it in to place.
-
24Modeling the Pillars
In this lecture we turn our attention to modeling the environment. We use Blender's Quad View to see our object from all sides as we're modeling the pillars. And we use the Circle Select Tool to "paint" a selection of faces.
-
25Blocking in the Scene
In this lecture we begin to layout the basic objects in our scene. We create the floor, walls, and ceiling of the environment and create a camera in the scene. We create a new window in Blender's interface so we can view our scene from the camera's point of view.
-
26Adding Scene Elements
In this lecture we create a few extra objects in the scene. We create a staircase and a tomb from basic shapes while using Blender's Extrude and Loop Cut tools.
-
27What is UV Mapping?
This lecture is an introduction to why UV mapping is important for creating any kind of 3D scene. To create detailed textures on our objects, we will need to use Blender's UV Mapping Tools so we can apply two-dimensional images to our three-dimensional objects.
-
28UV Mapping Basics
In this lecture we talk about Blender's UV mapping tools, the process of UV mapping, and how to mark seams and unwrap an 3D object.
-
29UV Mapping the Pillars
We now turn our attention to UV mapping the more complex shapes of the pillars. We talk about how we can use Blender's UV Mapping Tools to place seams, avoid stretching, and pack the UV islands into the 0-to-1 space in the UV editor.
-
30Testing the UV Maps
If one of the goals of UV mapping is to avoid stretching our textures, how can we test if our UV map will cause stretching? In this lecture we use Blender's built-in texture pattern to test if our UV maps will introduce stretching into our textures. And we go over how to fix this if they do.
-
31UV Mapping the Environment
In this lecture we use Blender's UV Mapping Tools to UV map the staircase, tomb, and ceiling of our environment. We then use the test pattern to see and minimize any stretching.
-
32Finishing the Environment UVs
We now finish UV mapping the environment by working on the floor, walls, and ceiling beams of the environment. We use Blender's UV test pattern to check for stretching and even add some extra geometry to ensure proper mapping.
-
33Beginning the Mech UVs
In this lecture we use Blender's UV Mapping Tools to create a UV map for the mech character. We mark seams to define the UV islands to try and avoid stretching and use Blender's UV test pattern to visualize the stretching as we work.
-
34Finishing the Mech UVs
In this lecture we use Blender UV Mapping Tools such as Average Island Scale and Pack Islands to ensure that there are no overlapping UV islands, and that they all fit within the 0-to-1 space in the UV Editor.
-
35Materials for the Mech
In this lecture we use Blender's Cycles Renderer to assign an Emission material to a polygon plane. This creates a soft light that we can use to light our scene while we assign and test materials for the mech.
-
36Finishing the Materials
In this lecture we continue adding basic materials to the objects in our scene. We use Blender's Rendered Viewport Shading to see a preview render of our scene.
-
37Sculpting the Floor
In this lecture we use Blender's Sculpt Tools to create ridges and mounds in the floor of the environment. We test various MatCaps to view the sculpt detail in the 3D view, and we add a procedural texture to the sculpt brush to get finer detail on the floor.
-
38Sculpting the Coffin and Stairs
To sculpt detail onto the tomb in our scene, we look at the different subdivision methods in Blender's Multiresolution Modifier. We test both Catmull-Clark and Simple subdivision methods.
-
39Sculpting the Ceiling
In this lecture we use Blender's Sculpt Tools to create the rocky surface for the hole in the ceiling. We also add a Spot Light into the scene to test how light looks coming in through the hole.
-
40Texturing the Coffin and Stairs
GIMP is a free, open-source image editor that can be used to create textures for our scene in Blender. In this lecture, we use GIMP to create a seamless stone texture. We then apply that texture to the tomb, using Blender's Node Editor.
-
41Applying Bump Textures
In this lecture we use our image texture to generate bump detail in our render. We Blender's Node Editor to connect the bump information to the material of the tomb, stairs, and floor.
-
42Texturing the Pillars
In this lecture we user GIMP to create a multi-layered image texture that we can apply to the pillars in our Blender scene. We use the Node Editor again to connect our textures to the material of the object.
-
43Texturing the Ceiling
In this lecture we combine techniques from the previous videos to texture the ceiling of the environment. We use GIMP to create a texture based on the UV map of the ceiling object, and we cut and paste image elements to create sand stone and rock textures.
-
44Texturing the Walls
For the walls we build a stone texture in GIMP with an overlay of hieroglyphics. We then bring this texture into Blender and use the Node Editor to hook it up to the wall material.
-
45Texturing the Mech
In this lecture we create a seamless metal texture in GIMP and use this for the mech in Blender. We also set-up the material for the rubber hoses and joint on the mech.
-
46Preparing the Mech for Rigging
Before we can right the mech we need to organize the objects of the mech into logic groups. We use Blender's Join and Separate tools to reorganize the structure of the mech's body parts so we can rig the character properly.
-
47Finishing the Prep Work
In this lecture we establish pivot points for the limbs and spot light of the mech. We use Blender's Set Origin feature and 3D cursor to set the pivot points.
-
48Creating the Armature
In this lecture we start creating the rig of the mech using Blender's Armature tools. We create the bones for the limbs, light, and fingers of the mech.
-
49Adjusting Roll and Mirroring
The roll of the a character's bones dictate how the limbs will be able to move and rotate. In this video we user Blender's Armature tools to adjust the roll angles of the mech's bones. We also use the Flip Names feature to duplicate the left side limbs and Mirror them over to the right side with the proper names.
-
50Parenting and IK Legs
We begin this lecture by parenting the bones of the mech's limbs to the main bone of its body. We then work on creating an Inverse Kinematic chain for each of the legs.
-
51Creating a Foot Roll Rig
When animating a character, the ability to roll the foot up onto the toes and back onto the heel is extremely useful. In this lecture, we use Blender's bone constraints to create a foot roll rig for the mech character.
-
52Setting Up the Arms and Hands
In this lecture we create an IK chain for the arms and an elbow control bone. We also use Blender's Copy Constraint to set-up a system to bend all the joints of a finger by just rotating one bone.
-
53Creating Custom Shapes
When animating our character in Blender, it's best to not select and directly transform many of the individual bones of the rig. Many bones do not need to be accessed and can break the rig if they are disturbed. To avoid this we'll create Custom Shapes for the bones we want to animate, and hide all the rest.
-
54Finishing the Custom Shapes
When animating our character in Blender, it's best to not select and directly transform many of the individual bones of the rig. Many bones do not need to be accessed and can break the rig if they are disturbed. To avoid this we'll create Custom Shapes for the bones we want to animate, and hide all the rest.
-
55Creating the Master Control
The last control object we will create for our character rig is the Master Control. We create a single bone in Blender and give it a custom shape. We then parent the main bones to this object. Now we are able to move the character and the rig, as a unit, around our scene.
-
56Prepping for Animation
In this lecture we prepare the Blender scene for animation. We disable selection for the environment and the character, so that we will only select the character's rig. In addition, we set-up the user interface to display the Dope Sheet and Graph Editor.
-
57Creating the First Keyframes
In this lecture we being using Blender's animation tools to block out the basic movement of the mech in the scene. We set keyframe at the end and at the beginning of the animation, and turn on Blender's Auto Key function.
-
58Using the Graph Editor
In this lecture we begin using Blender's Graph Editor to fine-tune the animation. We use the Free Handle type to adjust the curves in the graph editor and talk about the benefits of deleting keyframes, rather than adding more.
-
59Beginning the Poses
In this lecture we begin posing our mech character as it flies into the scene. We use Blender's Dope Sheet to establish the time of our poses.
-
60Continuing the Poses
In this lecture we continue posing our mech character as it flies into the scene. We use Blender's Dope Sheet to establish the time of our poses.
-
61Drop to the Ground
It's time to come in for a landing. In this lecture we work on having the mech drop to the ground in our scene. We use Blender's Dope Sheet and Graph Editor to adjust the timing of the drop.
-
62Stick the Landing
In this lecture we talk about the difference between Blender's Bezier and Linear keyframe interpolation. We work on the follow through actions as the mech drops to the ground.
-
63Looking Around
Once the mech character is on the ground we need to have him look around the environment. In this lecture we use Blender's Dope Sheet to adjust the timing as the character looks from side to side.
-
64Animating the Light
In this lecture we finish up the animation in Blender by working on the mech's light. We use the custom shape that we created earlier to animate the direction of the light. And we take a look at the completed animation.
-
65Volumetric Lighting
In this lecture we use Blender's Volume Scatter shader to create cones of light in our scene. This will be used for the light coming down into the environment as well as the mech's spot light.
-
66Setting up the Mech Light
In this lecture we parent a Blender spot light to the mech's light and turn off shadows for the lens so that the light will shine through the geometry. This will allow the light to shine out into the scene and be effected by our volumetric lighting.
-
67Finishing the Lighting in the Scene
In this lecture we add Blender's Emission Shader to the lens geometry to give the impression that the light within is shining through. We also map a sky texture to a polygon plane, to be seen through the hole in our ceiling.



Social Network