Creating a Scene in Blender 3D.
- Description
- Curriculum
- FAQ
- Reviews
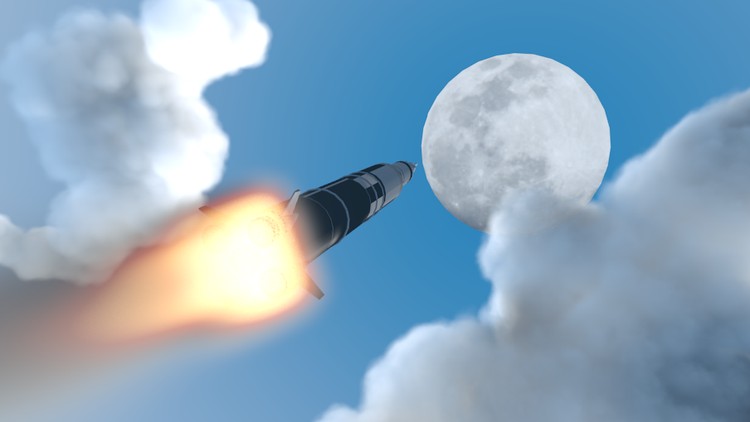
This course will take you through the processes involved in creating the above scene of the Saturn 5 rocketing to the moon, using the Open Source 3D modelling application Blender 3D.
Learning Outcomes
At the end of the course you should be able to:
- Source Public Domain or Creative Commons 3D models.
- Know when it is okay to use such models within your own work.
- Create basic models of the moon, clouds and use Quick Effects to turn an object into Quick Smoke, then modify to show flames and smoke.
- Use basic lighting.
- Produce a single composition with a simple animation.
Course Structure
- Introduction
- Sourcing pre-made models and images to use in a scene
- Bringing it all together
- Composition
- Adding light
- Rendering still image
- Adding movement for simple animation
- Dealing with Smoke and Fire
- Rendering animation
- Course Conclusion
The course contains approximately 2 hours of video tutorial, so you should expect to add a further 4 hours in order to follow using Blender to replicate the demonstrations.
This course is designed for students wishing to following a project created in Blender without having to learn the complexities of the interface first. You will discover simple techniques through out the course. This course compliments 'Noobie's Guide to Modelling in Blender 3D'.
-
1Introduction
This course will take you through the processes involved in creating the above scene of the Saturn 5 rocketing to the moon, using the Open Source 3D modelling application Blender 3D. This video shows your were to get Blender and why a 3 button mouse is need, even on the Mac. This video also sets the context of the course. Through out this course, the demonstrations use the left mouse button for selecting objects. Normally, Blender has a default setting on selection with right mouse button. This video shows you how to change this setting.
-
2Mouse Select Button
-
3Searching for 3D models & checking media usage guidelines.
In this video I encourage students to make note of NASA's Media Usage Guidelines. After seeing this video you should be able to search through NASA's website for public domain 3D models of their spacecraft. It is important to read through NASA's Media Usage Guidelines before using their 3D models.
(I have added the zip file with the NASA Saturn5 model as a resource)
-
4Editing a Moon Image In Photoshop
This video takes you through editing a moon image in Photoshop for use as a UV Map in Blender.
-
5Activity One.
-
6Importing Saturn 5 & Adding Exhaust Smoke
This video shows you how the Saturn 5 rocket model was imported into Blender.
(The blend file associated with this lecture has been added below as a resource).
I have added the zip files that contains the saturnv 3Ds file and also the Moon surface image that you will need to use in Lecture 6. Ensure you store these files on your hard drive in a suitable folder that you can easily find. Unzip saturnv-c.zip by double clicking on the zip file, this will uncompress the file and create a new folder (saturnv-c). This folder will be the one you locate when you are going to import the model of the Saturn 5 as mentioned in Lecture 5.
-
7Adding the Moon into the Scene
This video shows you how a circle object is UV Unwrapped and how the the image of the moon added.
(The blend file associated with this lecture has been added below as a resource).
-
8Adding Clouds to the Scene
In this video you are shown how to set the Cloud Simulator Add-On so that you can turn an object into a cloud. The object used is a Metaball Object.
(The blend file associated with this lecture has been added below as a resource).
-
9Using an Empty Object As a Parent to the Saturn5 & Exhaust
In order to control several objects together, this video show you how useful an Empty Object can be and what it is.
(The blend file associated with this lecture has been added in the previous lecture as a resource).
-
10Positioning the Moon & Working on Composition
In this video you will be shown the starting possess on composing the objects into a scene that can be rendered.
(The blend file associated with this lecture has been added below as a resource).
-
11Using an Empty to adjust the Scene
Again we return to using a second Empty Object to help adjust the scene.
(The blend file associated with this lecture has been added below as a resource).
-
15Introduction to Section 7 & 8
An introduction to what is covered in section 7 & 8. Various issues occur in the animation process and tips are provided on how to go about resolving problems. Learners are also encouraged to keep a note book or journal as a record of processed used so that they can be repeated at a later date.
-
16Issues scaling clouds & animating rocket
In this video we start the process of animating the scene. Issues arise concerning domains crossing over one another.
(The blend file associated with this lecture has been added in Lecture 11).
-
17Re-working the Rocket's Exhaust Smoke & Flames
This video continues on from where the last one left off.
(The blend file associated with this lecture has been added below as a resource).
-
18Preparations for rendering only the background
In this video we look at how splitting the scene into two parts can help.
(The blend file associated with this lecture has been added in Lecture 11 and midway through the one below is uesd).
-
19Animating the 3D camera instead of the rocket
Now with the clouds in the background image, we look at ways to animate the rocket and smoke.
(The blend file associated with this lecture has been added below as a resource).
-
20Rendering Rocket & Flames
This video looks at preparing to render the rocket and flames image sequence.
(The blend file associated with this lecture was added in Lecture 17).
-
21Working with the Quick Smoke Simulator
In the previous video, I felt the smoke simulations did not have enough movement. In this video we re-examine how the smoke simulator works and look at other ways to add this effect to the Saturn 5.
(There are two resources below, one showing a single smoke and flame simulation, while the second shows the 5 circle simulation, both shown in the above lecture).
-
22Re-working the Rocket's Animation
Instead of animating the rocket, instead we look at how animating the camera pass a static rocket can simulate movement. It is all about thinking outside the box.
(The blend file associated with this lecture was added in the previous lecture).
-
23Review of Sections 7 & 8
In this video we review what has taken place over the last two sections and why the creative process is about refining ideas.
-
24Compositing in Blender's Non-Linear Editor
In this video we explore using Blender's non-linear editing tools can help with the compositing of the two parts of the scene.
(For this section I have not included the files as it would contain the image sequence from my render. I would encourage you to render out your own images, into a separate folder, and then import them into a new file in Blender and follow the demonstration in this lecture).
-
25Activity Three


Social Network