Create Game Characters with Blender
- Description
- Curriculum
- FAQ
- Reviews
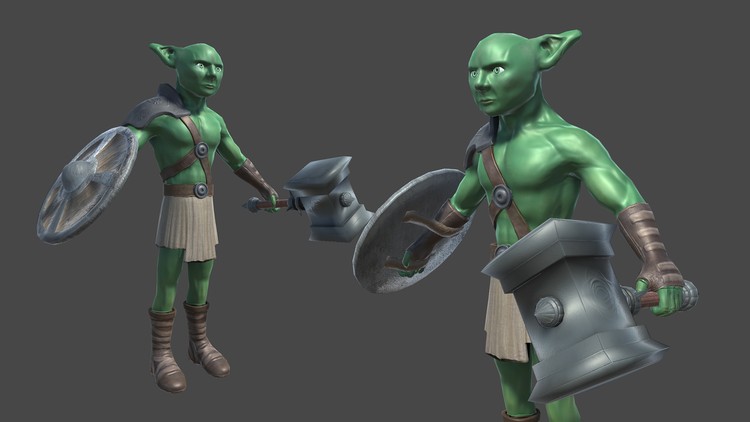
Learn how to create your own game characters in Blender 3D! Learn how to model, texture, rig, and animate a character in Blender 3D. Discover how to bring the character into Unity and set-up a character controller to move the character around.
Build your skills so that you can create your own game characters in Blender.
-
3D Model and Sculpt a Game Character in Blender
-
Use the Blender Retopology Tools
-
Create UV Maps and Bake Texture Maps in Blender
-
Use Texture Painting Tools in Blender
-
Rig a 3D Character with the Rigify Add-on in Blender
-
Animate Game Cycles for a Game Character in Blender
-
Import a Blender 3D Character to Unity
-
Set-up a Character Controller in Unity
Create Your Own Game Characters!
Learning to create your own game characters opens the door for you to create the incredible video games you’ve always dreamed of. Blender is free to download and use for any purpose and has proven itself to be a powerful tool for independent and commercial projects all over the world.
Blender provides an excellent low-cost way to learn the fundamentals of 3D modeling, texturing, and rendering. Since 1995, it has been growing in features and usage in the animation and visual effects industry.
Content and Overview
In this Intermediate Blender course you’ll create a game character from the first polygon to the final controllable character in the Unity game engine. Throughout the course you’ll learn about the Blender modeling, texturing, rigging, and animation tools. You’ll learn the techniques and strategies needed to tackle a complex project such as this, so you can bring your own characters to life.
In the first section we will create a character using the sculpting tools in Blender. We will model a base mesh using box modeling techniques, and then we will use the Multiresolution modifier in Blender to create high-resolution detail on the character.
We will then use the Blender retopology tools, the Grease Pencil and the BSurfaces tools, to create a low resolution version of our high-resolution sculpt. And we will bake Normal and Ambient Occlusion maps in Blender, from the hi-res sculpt to the low-poly mesh. We will then import these texture maps into Unity and test them on our character in-game.
We will look at some of the unique issues regarding UV mapping a character in Blender. We will use the UV mapping tools in Blender to create an organized UV map that can be exported to external paint programs like Photoshop or GIMP for texturing. And we will look at the Texture Painting tools in Blender and how to use them to create texture maps for the character.
Then we will use the Blender Rigify add-on to create a basic rig for our game character. You’ll learn how to prep the character for rigging and generate the base rig. We will then generate the control objects of the rig and go over the various controls and how they can be used during animation. From there we will adjust the weights of the character in Blender using vertex groups, and parent the character’s war hammer and shield to the rig.
You’ll then learn the basics of creating animation cycles for a game character in Blender. We’ll use Blender’s Graph Editor and Dope Sheet to animate the Idle and Run animations, as well as create a Jump Pose.
Finally, we will take it all into Unity and write some code to get our character running and jumping through a test level.
“I love your tutorials! For the first time, I’m able to understand Blender! Thank you so much!” -Jade W
“Great work, Darrin. You make a great teacher as well as a fantastic 3D artist. I really appreciate your work; can’t wait to see what you do next! -theLegendofSamuel
“I just wanted to say how much I appreciate these high quality tutorials you put out!!! You are truly an inspirational person. -Zach B
-
6Beginning to Sculpt
-
7Using the Mask Tool
-
8Sculpting the Upper Arms
-
9Working on the Torso
-
10Sculpting the Lower Arms
-
11Adjusting Proportions
-
12Sculpting the Hand
-
13Detailing the Fingers
-
14Beginning the Face
-
15Modeling the Eyeball
-
16Finishing the Face
-
17Sculpting the Boots
-
18Using Retopology Tools for the Straps
-
19Starting the Clothes and Accessories
-
20Sculpting the Gloves
-
21Adding Detail to the Gloves
-
22Sculpting Cloth Folds
-
23Adding Texture to Sculpt Brushes
-
24Modeling the Shoulder Armor
-
25Using the Anchor Stroke Method
-
26Creating the Fingernails
-
27Sculpting the Ears
-
44Setting Up the Interface for Texturing
-
45Filling the Base Colors
-
46Using Paint Slots as Layers
-
47Adding a Texture to the Brush
-
48Painting the Character's Armor
-
49Prepping to Paint Cloth Texture
-
50Texture Painting the Cloth
-
51Texturing the Boots
-
52Texturing the Gauntlet
-
53Texturing the Skin
-
54Texturing the Face
-
55Exporting the Texture Maps
-
56Testing the Textures in Unity


Social Network