Architectural Design Tools in Blender - 3D Design
Develop your creative and technical skills to create photo realistic architectural scenes and beautiful 3D models

- Description
- Curriculum
- FAQ
- Reviews
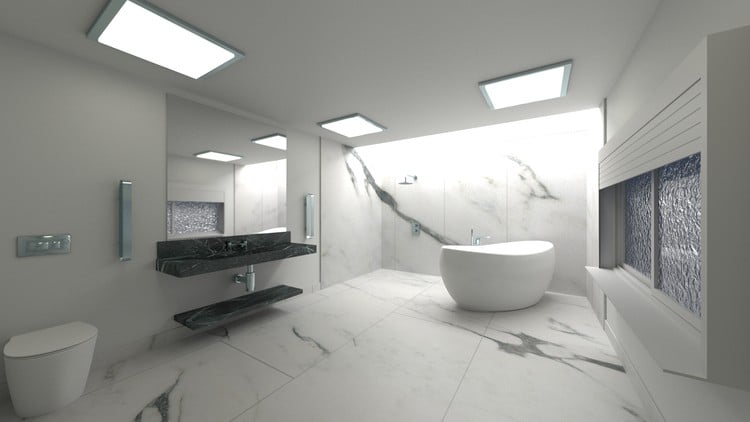
Welcome to Architectural Design Tools in Blender – Learn 3D Modelling, 3D Lighting & 3D Rendering and start creating Photo Realistic Interior Scenes & Detailed 3D Models in the free and open source software blender 3x.
This highly rated course has had great success teaching students on Udemy!
Packed with over 6 hours of video training this is the most comprehensive course you need. Even if you have no 3D experience, this course will teach you to 3D model & render in blender.
Here’s how:
-
The course is taught by a top instructor with almost 100,000 students
-
Get professional results fast and efficiently and to the highest possible standard
-
3D software doesn’t need to be hard to master. This course is designed so you get results
-
No previous 3D experience required, get experience using the very basic tools right through to the more advanced
-
Save yourself time by learning the shortcuts and smart workflows to accelerate your projects
-
Learn how to achieve accuracy when designing and 3D modelling
This course takes you step – by – step through engaging video tutorials and teaches you how to create interior 3D scenes while learning the free and open source software blender
Some of the topics covered during the course include:
-
Design floor plans with ease
-
Learn how to quickly add rooms to the scene
-
Learn how to create custom 3D models
-
Add real world material to your scene
-
Learn how to add real world lighting for that added realism
-
Control every design element within your scene
So what are you waiting for.
Click the BUY NOW button and get the skills to begin 3D modelling, lighting and rendering interior 3D scenes
Draft & Design
3D Modelling the Scene
Material & Lighting
-
15
 Intro to FreeCAD and DXF File Converter
 -
16
Extruding Walls
-
17
Adding Door using Archimesh
-
18
Adding Window Using Archimesh
-
19
3D Modelling the Vanity Unit
-
20
3D Modelling the Toilet Part 1
-
21
3D Modelling the Toilet Part 2
-
22
3D Modelling the Button Flush
-
23
3D Modelling the Bath
-
24
3D Modelling the Bath Faucet Part 1
-
25
3D Modelling the Bath Faucet Part 2
-
26
3D Modelling the Vanity Taps
-
27
3D Modelling the Shower Head
-
28
3D Modelling the Shower Buttons
-
29
Adding the Bathroom Blind
-
30
3D Modelling the Vanity Waste Pipes
-
31
3D Modelling the Vanity Splash Back
-
32
3D Modelling the Ceiling
-
33
3D Modelling Shower Cladding
-
34
Modelling a Ceiling Light
-
35
Where to Get Environment and Texture Maps
-
36
Adding an Environment Texture to Help Light the Scene
-
37
3D Modelling a Towel Holder
Rendering
-
38
Adding a Render Camera & Checking face Orientation
-
39
Adding marble Material to the Floor
-
40
Adding Shower Cladding Material
-
41
Creating a Vanity Material
-
42
Creating a Metal Material
-
43
Creating a Bath & Rubber Material
-
44
Adding Mirror Material
-
45
Modifying Bathroom Glass
-
46
Adding Light Material to the Ceiling Light
Architectural Design Tools
Take control & create your own Models
Lighting & Materials
-
54
Creating the Vanity Top
-
55
Modelling the bottom shelf of the vanity
-
56
The modelling images we will use
-
57
Adding these drawings as modelling Pictures
-
58
Adding Image for a side view
-
59
Modelling the toilet
-
60
Modelling the toilet Seat
-
61
Adding bath drawing as modelling Pictures
-
62
Modelling the bath
-
63
Finishing off the bath model
-
64
Modelling a button flush
-
65
Modelling the bath mixer
-
66
Modelling the bath mixers water pipe
-
67
Finishing off the bath mixer
-
68
Placing the bath mixer in the scene
-
69
Modelling the vanity taps
-
70
Modelling shower controls
-
71
Modelling a shower Head
-
72
Modelling a towel holder
-
73
Modelling the vanity waste pipes
-
74
Modelling the splash back and mirror
-
75
Modelling square lights for the ceiling
-
76
Adding a roof light to the scene
Render out our Scene
-
77
An introduction to the Blender Cloud service
-
78
Adding an environment texture
-
79
Adding glass material
-
80
Applying a marble material to the Floor
-
81
Adding a marble material to the walls
-
82
Adding a bath tub material
-
83
Adding a mirror material
-
84
Adding a metal material
-
85
Adding a light material
-
86
Adding a vanity material
-
87
Adding a perspective camera to the scene
-
88
Adding light portals to the windows
How long do I have access to the course materials?
You can view and review the lecture materials indefinitely, like an on-demand channel.
Can I take my courses with me wherever I go?
Definitely! If you have an internet connection, courses on Udemy are available on any device at any time. If you don't have an internet connection, some instructors also let their students download course lectures. That's up to the instructor though, so make sure you get on their good side!
Stars 5
243
Stars 4
168
Stars 3
47
Stars 2
9
Stars 1
4
Course details
Video
7 hours
Lectures
22
Certificate of Completion
Popular courses

Social Network