3D Modeling in Blender 2.8 for Unity Video Game Developers
- Description
- Curriculum
- FAQ
- Reviews

In this course, students will learn the basic core components of building 3D models using Blender 2.8 and Unity 2018.2. The lessons contained within the course allow the student to gradually learn important tools used for everyday modeling, while providing simple objects to practice on which give the tools more meaning through practical hands on experience.
As the course progresses, you’ll be introduced to new tools, and then given the task of creating a simple prop that makes use of the new information you have acquired while continuing to reinforce previously learned material all along the journey.
By the end of this course, you should be able to construct basic 3D props for your Unity Prototype Games. With enough practice and experience, you’ll be well on your way to publishing your first game.
-
1What You Will Learn
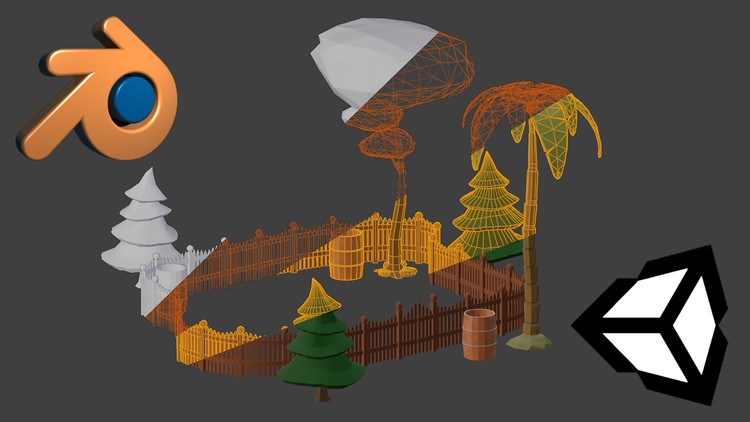
This course focuses on creating ordinary props while teaching the individual tools needed for 3D modeling in Blender. Rather than giving you a glossary of tools to practice and then showing what you can do with them, I’ve organized this course to demonstrate the use of each tool while assembling a few common props. We’ll be making a low-poly barrel, some low-poly trees and a modular curvy picket fence.
In this course, you’ll learn how to...
Use Modifiers... such as Mirror, Array & Curve Modifiers
Quick & Easy UV Unwrapping with Cube Projection & Seamless Textures (perfect for prototyping)
UV Editing Tools such as Island Selection and Weld
Adding a New Material & Assigning Multiple Materials to Objects
Flat Color Materials (No UVs Required)
Exporting from Blender & Importing to Unity
Assigning Textures to Materials in Unity
Sculpting & Proportional Editing
Subdivide, Knife & Rip Region
Smooth & Randomize
Bridge & Solidify
Loop Select, Loop Cut & Slide and Offset Edge Loop Cut
Pivot Points, Axis & Plane Locking
Separate & Join
Multiple Object Editing
We’ll start with the basics...
Select, Multiselect & Link Select
Duplicate, Delete, Undo & Redo
Move, Rotate & Scale
Extrude, Inset & Face Fill
Add a Mesh, Curve or 3D Text
Triangulate
Increment & Vertex Snapping
Convert to Curve & Convert to Mesh
Hide & Lock Objects with Blender’s new Collections
Discover Blender’s new Shading Types (Wireframe, Solid, LookDev & Rendered)
I like to encourage students to use the discussions for asking questions and sharing screenshots of their models while taking the course. This allows me, and other students to answer questions, give feedback and watch as you continue to learn Blender 2.8 for Video Game Design.
Thank you for your interest in this course. I hope to see you in the next lecture.
-
2Textures Used in This Course
This lecture includes a zip file containing a small collection of textures, some of which are used in this course. You are welcome to use these textures for the purpose of learning Blender, prototyping, or however you find use for them.
-
3Custom Startup File
Learn how to start every new Blend project with the options you prefer using a Custom Startup File. Also learn how to reset all of your custom settings back to the Factory Default Settings.
-
4General Navigation
This lecture teaches a few simple techniques for navigating in Blender 2.8. By the end of the lecture, you should be able to rotate around an object, zoom in and out, pan up, down, left or right, toggle perspective and orthographic view modes and use preset viewpoints to look at an object in front, back, right, left, top or bottom view.
-
5A Note About Cheat Sheets
-
6Select, Delete & Undo
In this lecture you will learn how to Select, Delete and Undo in Blender 2.8. You'll be able to use this information to remove unwanted objects such as the camera, light and default cube from your scene while we make preparations for making a low-poly barrel in this section of the course.
-
7Add Mesh
In this lecture you'll learn how to Add a Mesh which you'll need to know in order to add a cylinder for creating a low-poly barrel.
-
8Increment Snapping
In this lecture you'll learn how to use Increment Snapping to help keep your 3D objects on grid. You'll use this information to snap the new cylinder from the previous lecture up to the grid floor line where we will be constructing our low-poly barrel in this section of the course.
-
9Loop Cut & Slide
In this lecture you'll learn to use the Loop Cut & Slide tool whenever you need to add loops to your geometry. You'll discover additional options that allow you to add additional cuts and smoothness your new loops as they are created.
-
10Scale
In this lecture you will learn how to Scale your geometry by first using and understanding the Scale Tool's gizmo and then accessing keyboard shortcuts for greater efficiency in your work flow.
-
11Inset
In this lecture you'll learn how to use the Inset Tool's gizmo and then how to use the keyboard shortcut equivalent to help enhance your workflow. You'll use Inset to further construct our working model of a low-poly barrel in preparation for extruding in the following lecture.
-
12Extrude
In this lecture you'll learn how to Extrude using the Extrude Region Tool's gizmo and then the keyboard shortcut for optimal efficiency in your work flow. You'll extrude the low-poly barrel's top and bottom to give the illusion of depth.
-
13Shading Types: Wireframe & Solid
In this lecture you'll learn how to toggle back and forth between Wireframe and Solid Shading Types in order to be able to see through the 3D geometry while editing areas that would otherwise be impossible to see, such as the interior parts of our low-poly barrel. You'll use Wireframe Mode to push the top face of the barrel down towards the bottom, giving the appearance of a hollow barrel prop.
-
14Loop Select
in this lecture you'll learn how to Loop Select and add loops to your current selections. You'll also learn how Loop Select works specifically with quads and how to recognize why some loops are interrupted while others continue in a complete circle. By the end of this lecture we'll Loop Select the two loops where we want to start constructing metal straps (or bands) to hold the wooden panels of our low-poly barrel together.
-
15Duplicate & Separate Selection
In this lecture you'll learn how to Duplicate geometry in Edit Mode and then Separate the duplicated selection into a new object using the respective keyboard shortcuts. By the end of this lecture you'll duplicate the two loops in the center of the barrel and separate them into a new object for the purpose of creating a metal strap in upcoming lectures.
-
16Convert to Curve (from Mesh)
In this lecture you'll learn how to convert a mesh object, consisting of only edges and vertices (no faces), into a Curve object in preparation for the next lecture.
-
17Curve: Bevel
In this lecture you'll learn how to manipulate a Curve object using the Curve Tab Bevel Panel options. You'll learn how to use the Depth and Resolution options to add thickness to the Curve object before reconverting the Curve back to a Mesh once again.
-
18Join
In this lecture you'll learn the keyboard shortcut for Joining multiple objects together as one. You'll also discover the importance of selecting objects in a specific order to gain more control over how the newly joined objects will be named after performing this procedure. This lecture also talks about the relevance of the Currently Selected objects and the Active Selection in Blender.
-
19UV Unwrap: Cube Projection
In this lecture you'll learn how to access the UV Mapping Menu and the Cube Projection method for quickly unwrapping your model. You'll also learn why using Seamless Textures and Cube Projection are good for prototyping.
-
20New Material
In this lecture you'll learn how to add and reuse materials for UV Unwrapped model. You'll use this information to add the wood and metal textures to our barrel prop.
-
21UV Selections: Vertex, Edge, Face & Island
In this lecture you'll learn how to use some of the UV Selection tools such as Island and Edge. This will help you manipulate UV information in order to give the barrel prop more randomness while continuing to use a Seamless Texture.
-
22UV: Weld Tools
In this lecture you'll learn how to straighten UV edges using the UV Weld Tools.
-
23Barrel Model: Start to Finish (from Scratch)
In this lecture, you'll be able to see the low-poly 3D barrel created from beginning to end without all of the tool explanations between. I'll continue talking about what I'm doing, but you'll benefit by seeing the actual work flow in real time.
-
24Barrel Section Quiz
Pop quiz for material covered in the Low-poly Barrel section of the course.
-
25Collections: Hide
In this lecture you'll learn about the recent change over from Layers to Collections. You'll learn how to use the Hide shortcut key as well as the Collections visibility icons for showing and hiding objects in the scene.
-
26Subdivide & Triangulate
In this lecture you'll learn how to subdivide selected geometry and use the worksheet to fine tune the subdivision with smoothness and randomness options. You'll subdivide a cube to look more like a sphere and then triangulate the shape in preparation for sculpting in the next lecture.
-
27Sculpting Workspace
In this lecture you'll learn how to use Blender's Sculpting Workspace to sculpt the shape of a low-poly tree top. You'll also learn how to adjust the strength and radius of your sculpting brush, change the color of the MatCap material and turn off mirroring
-
28Proportional Editing (Tree Trunk)
In this lecture you'll learn the basic use of Proportional Editing. You'll use this information to manipulate a bending tree trunk.
-
29Offset Edge Loop Cut (Tree Branching)
In this lecture you will learn how to use the Offset Edge Loop Cut Tool's gizmo to create an area on the tree trunk suitable for branching out.
-
30Smooth Tool (Branch Segment Smoothing)
In this lecture you will learn how to use the Smooth Tool's gizmo and then the keyboard shortcut equivalent for a more efficient work flow.
-
31Organic Adjustments: Tree Bottom
In this lecture you'll learn how to transform a symmetrical tree bottom into something that looks a bit more organic. You'll use familiar tools already taught in this course to achieve a more organic look to your tree bottom.
-
32Organic Adjustments: Tree Top
In this lecture you'll learn to duplicate existing geometry and then use common tools such as rotate and scale to make subtle changes that can change the overall look of your object. In this case, we'll be using the upper part of our tree as a template, and reshaping the copied pieces to look unique in other regions of the tree's branches.
-
33Rip Region (Rocks)
In this lecture you'll learn how to use the Rip Region Tool's gizmo and keyboard shortcut keys to quickly tear areas of geometry apart and then Fill them back in using Blender's Fill keyboard shortcut.
-
34Flat Color Materials (No UVs Required)
In this lecture you'll learn how to create flat color materials that do not require any UV information at all.
-
35Palm Tree Trunk
In this lecture you'll learn how to design a palm tree trunk using some of the tools you've learned from previous lectures. You'll use the Loop Cut & Slide and Proportional Editing as well as a few other tools to get the job done.
-
36Leaf Shape (Plane)
In this lecture you'll learn to use a Plane to design a flat leaf shape. This leaf will be used in future lectures as a template for designing the leafy section of your Palm Tree model.
-
37Leaf Sag (Bezier Curve)
Learn to use a Bezier Curve to allow the flat plane Leaf Shape to curve as if it were sagging from its own weight.
-
38Leaf Solidify
Learn to use the Solidify Tool to convert your flat plane leaf into a solid 3D mesh.
-
39Leaf Tears (Rip Region)
In this lecture you'll learn to add rips and tears into the geometry of your palm leaf. This will help make the object appear a little more organic.
-
40Leaf Colors (Assign Materials)
In this lecture you'll learn how to assign flat color materials to your existing models. We'll make use of a 2-tone color technique to assign dark shadows in the areas where the leaves have been torn and between the crevices of the palm trunk.
-
41Duplicating in Object Mode
In this lecture you'll start learning how to use Pivot Points while working in Object Mode. You'll use local pivot points to make your duplicate leaves rotate around the center of the palm tree's top area. Once all of the manipulations are completed, you'll learn how to reset all of your Location, Rotation and Scales to 0's and 1's respectively.
-
42Palm Tree Finishing Touches
In this lecture, we'll add a few finishing touches, including some coconuts along the top of the tree, a sandy drift at the base, a few extra tears in some of the leaves and so on.
-
43Pine Tree Top
In this lecture you will use the Randomize and Smooth tools to form the cone into a more organic looking pine tree segment.
-
44Pine Tree Trunk
In this lecture we'll create the pine tree trunk to place below the treetop segment of the model.
-
45Pine Tree Materials
Finally, we'll add some color materials to the pine tree model which should help bring it to life.
-
46Tree Section Quiz
Pop quiz for material covered in the Low-poly Trees section of the course.
-
47Fence Post & Cap
In this lecture we'll design the initial fence post and affix the upper region, also known as the post cap. We'll use familiar tools already learned throughout the course to create this object in preparation for our modular picket fence.
-
48Mirror Modifier (Modular Fence Post)
You'll learn how to apply the Mirror Modifier by ripping the existing fence post in half and mirroring the geometry on the x-axis.
-
49Fence Rails
In this lecture we'll add some rails to our fence posts using the Extrude tool.
-
50Bezier Curve (Fence Path)
You'll learn how to Add a Curve in this lecture. We'll use the curve to layout the path in which our modular fence will follow in upcoming lectures.
-
51Array Modifier (Repeating Fence)
You'll learn how to add and use the Array Modifier to multiply your geometry in a straight line. Choose the number of repeated objects and which axis to repeat them on.
-
52Curve Modifier (Curved Fence)
You'll use the Curve Modifier to force the fence array to follow the shape of a curve. Now the fence will actually twist and turn smoothly around the shape of the Bezier Curve that we created in a previous lecture.
-
53Fine Tuning & Smoothing (Fence Details)
We'll spend some time in this lecture fine tuning and smoothing the geometry of our fence. We'll focus on reducing the poly count and further enhancing the look of the geometry.
-
54Floating Geometry (Fence Pickets)
In this lecture we'll explore the possibility of creating floating geometry that is disconnected from other parts of the surrounding mesh information. You'll learn how to reduce your poly count using this technique, and also understand some of the potential consequences of using floating geometry for your models.
-
55Multiple Materials (Picket Fence)
We'll apply multiple materials to the finished fence in much the same way that we learned in previous lectures. The point of this lecture is to reinforce the process of applying materials to your finished models.
-
56Fence Gate
This lecture shows you how to separate a section of fence and use the geometry to fashion a gate that can actually open and close. You'll learn how to set pivot points for the purpose of getting a door to look like it's opening on a hinge joint.
-
57Fence Section Quiz
Pop quiz for material covered in the Low-poly Picket Fence section of the course.


Social Network